Light, Fluffy, and Soft Kansai-Style Okonomiyaki. Our favourite version is Kansai/Osaka style Okonomiyaki because that's where we first tried it, but we also enjoyed Hiroshima-style Okonomiyaki made with soba noodles. (Wikipedia) Kansai- or Osaka-style okonomiyaki is the predominant version of the dish, found throughout most of Japan. They may also have a diner-style counter where the cook prepares the dish in front of the customers. In Osaka (the largest city in the Kansai region), where this dish is said.
 Kansai-style, the most common version, mixes ingredients into the batter before grilling.
So quick and easy to make, Okonomiyaki has always been a favorite in our family.
When I was a little kid we used to call it "okonomi-yummy"!
You can Cook Light, Fluffy, and Soft Kansai-Style Okonomiyaki using 10 ingredients and 8 steps. Here is how you achieve it.
Kansai-style, the most common version, mixes ingredients into the batter before grilling.
So quick and easy to make, Okonomiyaki has always been a favorite in our family.
When I was a little kid we used to call it "okonomi-yummy"!
You can Cook Light, Fluffy, and Soft Kansai-Style Okonomiyaki using 10 ingredients and 8 steps. Here is how you achieve it.
Ingredients of Light, Fluffy, and Soft Kansai-Style Okonomiyaki
- Lets Go Prepare 200 grams of Plain flour.
- What You needis 250 grams of Japanese dashi stock.
- Lets Go Prepare 350 grams of Nagaimo yam.
- Lets Go Prepare 3 of Eggs.
- Lets Go Prepare 1/3 of Cabbage.
- What You needis 1 of Squid.
- What You needis 200 grams of Thinly sliced pork belly.
- Lets Go Prepare 1 of Japanese leek.
- It's 50 grams of Red pickled ginger (optional).
- Lets Go Prepare 1 of Tempura crumbs.
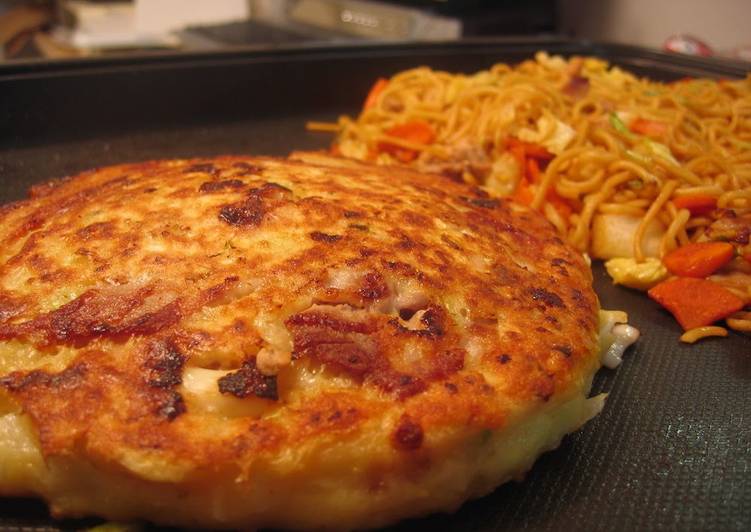
This time I made it with bacon, however thinly sliced pork is the original version. Scroll down past recipe to see more variations. But I already read a recipe for Okonomiyaki Ssauce, is not that difficult so when I make another, It will surely be 'Okonomiyaki'. Hope you all like the final product.
Light, Fluffy, and Soft Kansai-Style Okonomiyaki step by step
- Make dashi stock (I used dried bonito, konbu and stock powder) and leave to cool. Chop the cabbage and pickled ginger. Slice the Japanese leek. After preparing the squid slice into thin batons (7 mm x 2-3 cm). Cut the tentacles into the similar sizes. Cut the pork into bite sizes or leave as they are..
- Mix the flour with dashi stock and beaten eggs in a bowl. Peel and grate the nagaimo yam and add to the bowl. Mix in all the ingredients except the pork..
- Heat vegetable oil in a non-stick pan and pour the batter. Fry over medium to high heat for about 3 minutes (don't cover or touch)..
- Place the sliced pork on top. Shake the pan and remove the okonomiyaki bottom from the frying pan. Flip over when the edge of the batter starts to brown (the batter is quite runny, so it might be difficult.).
- After flipping over, cover with a lid and reduce heat to low. Fry for about 6 minutes and flip over when the bottom of the okonomiyaki is evenly browned. Cover with a lid and fry for another 3 minutes. Uncover and fry for another 3 minutes. Done!.
- I noted the cooking time as 3 min → 6 min → 3 min → 3 min but my husband usually doesn't use a timer! When both sides are nicely browned like the top photo, it's ready. In the last 3 minutes, uncover and fry until crispy. This okonomiyaki has lots of nagaimo yam so the fluffy and soft texture remains even after cooking too long..
- Serve with your favorite toppings..
- My husband may change the ratio or ingredients in the future, so I will keep you posted..
However, eating okonomiyaki is different from eating ordinary Japanese food. It might seem a bit confusing at first, since it isn't quite like any dishes overseas. This recipe is for the Osaka-style version, which can be topped with a variety of ingredients. Perhaps the most common version is Osaka-style okonomiyaki, which is also known as the Kansai-style. Osaka is known for an inexpensive and abundant food culture.